It's been a while since I blogged about Revitalizing my BBC Micro. In that time, I've performed a few upgrades readers might find interesting.
Display requirements
As useful as the tiny Amstrad CRT was, I wanted something bigger, brighter, and sharper. LCD is terrible for retro systems with blurry scaling attempting to draw images designed to take advantage of CRTs. Emulator authors spend significant effort trying to mimic CRT effects for an authentic retro feel - but the best option is to use a CRT.
Most machines in the 80s and early 90s were designed for TV compatibility and operated on a 15KHz horizontal refresh rate. People struggle to give away VGA CRT monitors but, they won't work as they start at 31.5KHz. British machines, like mine, also use the PAL (UK) video system rather than the NTSC (USA) system - a display for me will need to handle both.
If all you need are 15KHz frequencies, then Sony PVM is the way to go. I also own an Amiga 1200 capable of some VGA modes, so it would be nice to have one CRT for everything. Multi-sync monitors can do both but were rare in the 90s and are even rarer now, combined with high shipping costs on CRTs in general, make them a prohibitive choice.
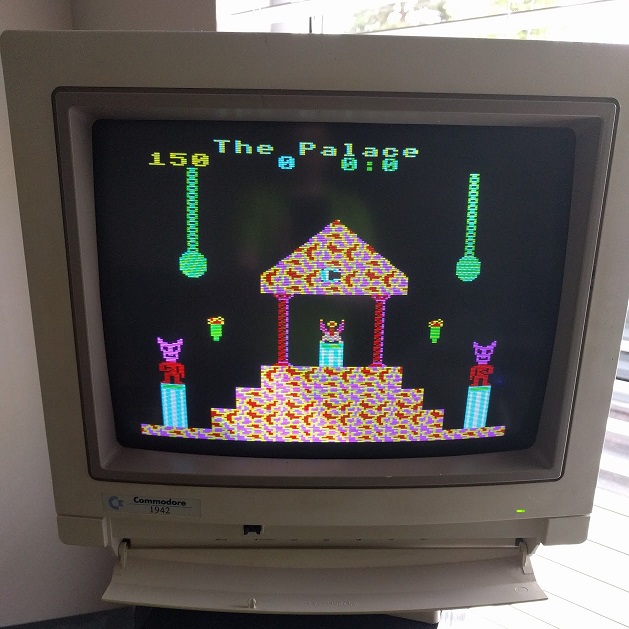
Commodore 1942 CRT
Luckily for me a Commodore 1942 CRT "bi-sync" turned up on Craigslist just 15 minutes from my house! It was designed for the later Amiga models so, it does both 15KHz most of my machines can do and some VGA resolutions, perfect.
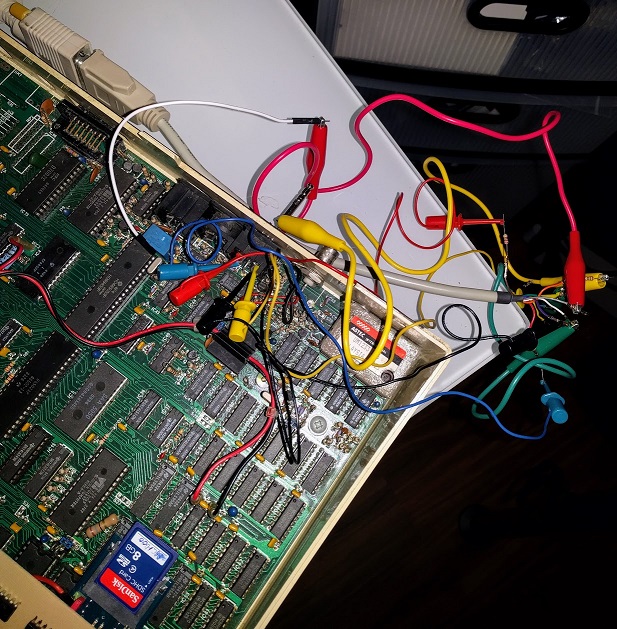
Connecting it to the BBC was a little trickier than I anticipated. That Amiga design means it expects the horizontal (HSYNC) and vertical sync (VSYNC) signals on two different pins to match the Amiga's video port rather than the composite sync (CSYNC) all my RGB capable machines offer (Amiga excluded).
I experimented with connecting CSYNC to HSYNC and then to VSYNC, but both failed to resolve a stable display. Digging into the Motorola 6845 CRT controller chip that powers the Beeb reveals both VSYNC and HSYNC on pins 40 and 39, respectively. A quick snip of the RGB port's unused 5v and sync pins let me repurpose them to HSYNC and VSYNC direct to the 6845. A stable but over-saturated picture was a welcome next step that didn't need me to create a SYNC splitting circuit, which I did later to connect with my Spectrum +3.
 The over-saturation is because the BBC Micro outputs either 0v or 5v - off or on - for each color. The Amiga monitor is analog and accepts any amount of color between 0v and 0.7v. I read guides on calculating the voltage drop, but it still looked saturated so, I kept increasing resistor values until I found values that looked right.
The final result made me smile. It looked better than the Microvitec CUB monitors our school had back in the day!
Speech synthesis
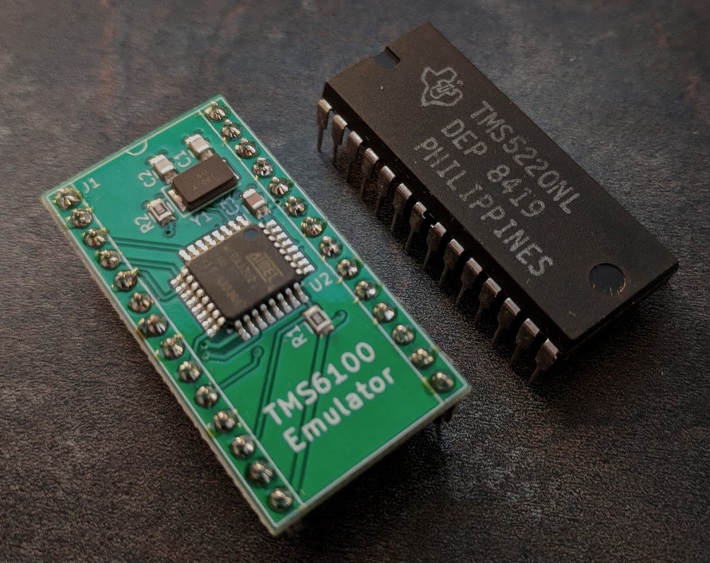
Hearing Superior Software's SPEECH package blurt out any phrase we cared to throw at it was a blown-away moment at school. I've always wondered what the official Acorn speech system was like, especially as every time I open the case empty sockets IC98 and IC99, call out for the Texas Instruments TMS5220 speech processor and associated TMS6100 voice synthesis memory.
The TMS5220 chip was a successor to that in Speak & Spell, Bally/Midway pinball machines, and some arcade games and is easy to come by. The TMS6100 was available in many variants, and the BBC commissioned some of their own, including one sampled by BBC news anchor Kenneth Kendall. This chip is rare, and the fact the TMS6100 is not a regular ROM means you can't just burn a copy. Luckily, Simon Inns created an emulator which, can run on an ATMega32U2 to provide a drop-in replacement!
I obtained a TMS5220 and pre-built TMS6100 emulator board from Mark Haysman at RetroClinic - I can thoroughly recommend his services! My SMT soldering skills aren't up to that.
After inserting the two chips and powering nothing looks different. This command sequence however provides a good test mechanism:
REPEAT : SOUND -1,GET,0,0 : UNTIL 0
Pressing any key on the keyboard will cause the machine to say aloud the letter. It does, however, have some odd ideas about what the symbols on the keyboard are.
I will be experimenting with this more as I dig through the capabilities in the manual as it isn't as easy to use as Superior Software's Speech! which lets you type things like:
*SPEECH
*SAY Hello there.
*SAY I've got a bad feeling about this.
ROM experiments
My school had a single copy of the Advanced User Guide, so I felt privileged when the teacher would let me borrow it. On reflection, I doubt anyone else wanted to. Page 395 cryptically teases:
Up to 16 paged ROMS are therefore catered for, 4 of which are on the main circuit board.
So the OS supports 16 ROMs but, there are only physical sockets for 4 (IC52, IC88, IC100, and IC101). Typically BASIC and the disc filing system (DFS or ADFS) take two of them leaving, just two usable ROM sockets for expansion.
The schematics reveal IC76 is the ROM Select Latch and is a 74LS163 with four output pins giving sixteen possible combinations. As the OS and circuitry support sixteen, we need to find a way to connect them.
The Beeb supports either 8K (2764) or 16K (27128) ROMs and EPROMs. Later 64KB (27512) chips became available which are almost pin-compatible with the 27128 except:
| 27512 | Pin | 27127 |
|---|---|---|
A15 |
1 | Vpp |
A14 |
27 | /PGM |
/OE |
22 | /OE, Vpp |
The /PGM and Vpp lines are for writing - an EPROM programmer will care about these but, our Beeb won't.
The A14 and A15 lines are the address lines for accessing the higher memory. With them both low, the chip acts like a regular 16K (27128) chip. With A14 high, it looks to the next available 16K, with A15 high the next 16K, and with A14 and A15 high the final 16K.
We can combine four 16K ROM images into a single 64K file and flash it to our 27512. I did just this with my Signstek TL866A Universal USB programmer.
By connecting A14 and A15 to the IC76 address line C and D outputs, we have effectively given whatever socket we connect the ability to appear as four ROMs (because a single ROM can be paged in at a time).
The icing on the cake is that the Beeb sports a push-out section left of the keyboard (affectionately known as the "ashtray"). This area is where a zero insertion force - ZIF socket - could be mounted to allow a ROM to be dropped in without needing to crack open the case.
Now I need to figure out how to mount this ZIF socket in the ashtray hole - there aren't any mounts. I suspect I'm going to need to make a PCB of some sort and put legs on it.
Building your own
Parts list
- 28-pin ZIF socket
- 28-pin DIP socket 0.6" wide
- length of 28-way ribbon cable
- 2.54mm header pins (you need two)
- 2x female-to-female jumper wires
Creating the cable
- Wire all pins from ZIF to DIP except for
1&27 - Solder two header pins to
11&12onIC76 - Jumper ZIF pin
1to11on IC76 - Jumper ZIF pin
27to12on IC76
Now insert a 27512 ROM flashed with four BBC ROMs of your choice, power up and type *HELP or *ROMS to see the images ready.
Check out alternatives for wiring up 64K ROMs or 32K SRAM chips from J.G. Harston
Second processor via a Pi Zero
The Beeb has a bunch of expansion ports hidden underneath the machine - the most unusual one being the Tube expansion bus which allows for a 2nd processor, by way of FIFO buffers, that facilitated message-passing IPC for console, errors, data, and system calls.
Acorn produced expansions for the Tube, including:
- 6502 second processor allowing well-behaved unmodified programs to run faster
- Z80 for CP/M
- 80286 for DOS or GEM
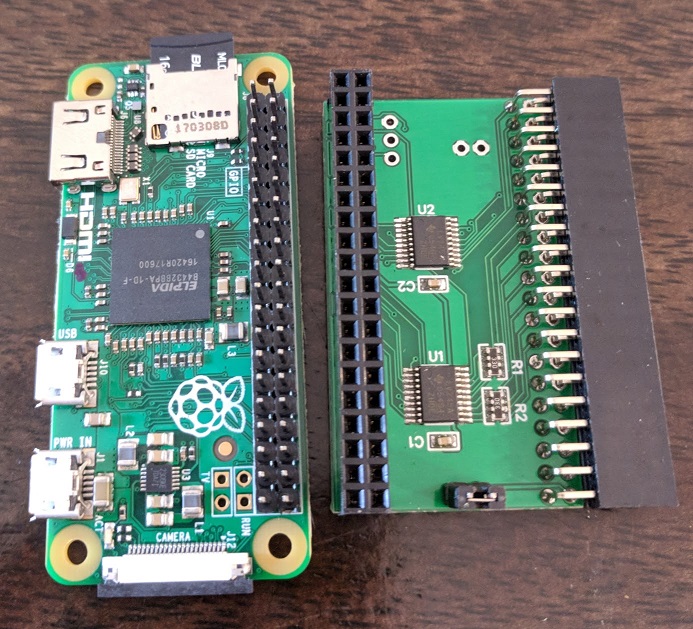 These expansions are hard to come by as they don't just feature the CPU but necessary additional isolation logic, memory and circuitry. David Banks developed PiTubeDirect to allow a Raspberry Pi to act as a second processor plugged into the Tube port by way of a 5V to 3.3V level shifter - I got mine from Kjell Sundby
The Raspberry Pi 3 can emulate these old processors at crazy speeds! 274MHz for the 6502, 112MHz for the Z80, 63MHz for the 80286, and even a 59MHz ARM2 (Acorn were using the Beeb to work on ARM prototypes)
What piqued my interest was using the Raspberry Pi Zero. It's small enough to fit under the BBC Micro and yet remains plugged into the Tube port out of sight. Latency was a problem on the Zero given the lower ARM processor so, they ported the CPU emulation core... to the GPU!
The 6502 emulation is reliable and enabled me to run the 6502 Second Processor Elite. I need to try to get GEM running on it just for fun although, it's a little trickier to find suitable disk images for Z80 and 80286 co-processor stuff.
[)amien
0 responses