I'm often digging into old bitmap font and UX design out of curiosity - and someday hope to revive a lot of these fonts in more modern formats using a pipeline similar to that for ZX Origins so we can get all the usable fonts, screenshots etc. out of them.
One limitation I've run into is digging into old Macintosh fonts. While James Friend's PCE.js puts System 6 and System 7 at your fingertips when it comes to later MacOS 7.5, 8 or 9 releases the site doesn't have you covered as PCE doesn't support PowerPC emulation (it emulates Motorola 68000 and Intel 8086 processors).
This is a shame for me as that's where the interface started diverging by adding color and some more interesting fonts. Additionally some third-party fonts are distributed in .sit (StuffIt Expander) or only work with later Mac OS versions.
Enter QEMU
Luckily, QEMU has us covered. It's an open-source emulator that unlike regular virtualization tools is quite capable of emulating completely different CPU architectures from ARM through to MIPS, PowerPC, RISC-V, Sparc and even IBM's big s390x z/Architecture.
With such a wide variety of options and settings available you can imagine it will require some digging through the user interface and you'd be wrong. There is no GUI however and the third party ones that exist mostly seem to be from 10 to 2 years out of date and many don't support Windows at all. The only "up to date" one I found - QtEmu - only supports configuring x86 virtual machines.
This is a shame as although I love the command-line for its scriptability when it comes to exploring valid combinations of options the command-line is mostly awful (the IBM AS/400 command-line and prompting system excluded).
You could try and build this yourself but Stefan Weil has you covered for pre-built QEMU Windows binaries
Please note that Mac sound support is missing here. There are "screamer" forks but the only binaries available are for Mac OS X so you'd have to build it yourself and there will probably be a whole lot of hoops to jump through.
Obtaining an OS install image
To install Mac OS 9 we're going to need a disk image/ISO to install from.
The nice people over at Mac OS 9 Lives have a Mac OS 9.2.2 Universal Installer ISO which is pre-configured and easy to use - it also conveniently includes a few extra tools and apps you'll need.
While Mac OS is copyrighted this image has been up for over 6 years so I like to think Apple are turning a blind eye in that people who want to use their legacy stuff can do so without expecting support from Apple - win-win. They also don't charge for their Operating Systems instead it's "free" with the hardware and I still have a MacBook Pro 15" so I won't feel bad about using it. Your mental mileage may vary.
Creating a machine & installing Mac OS 9
First off create a new folder to put your machine config into. (Windows won't let you stuff it into Program Files). I've chosen c:\retro\mac.
Now let's create an empty hard-drive image file:
cd "c:\program files\qemu"
qemu-img create -f qcow2 c:\retro\mac\MacOS9HD.img 5G
This creates a virtual hard-drive that can grow up to 5 GB in size and will allocate disk as it needs (copy-on-write). After installation this file will grow to about 660 MB.
Now before we go further remember the keyboard-shortcuts:
- CtrlAltG as you'll need it to get the mouse back
- CtrlAltF to get you in and out of full-screen mode
Now lets start the installer:
qemu-system-ppc -cpu "g4" -M mac99,via=pmu -m 512 -hda c:/retro/Mac/MacOS9HD.img -cdrom "c:/retro/Mac/Mac OS 9.2.2 Universal Install.iso" -boot d -g 1024x768x32 -device usb-kbd -device usb-mouse -sdl
This specifies that we want to use:
- a PowerPC G4 900MHz CPU
-cpu g4 - a PowerMAC based Mac with USB support
-M mac99,via=pmu - 512 MB of RAM
-m 512 - Our hard-drive image
-hda xxx - Our Installation CD mounted
-cdrom xxx - Boot from CD
-boot d - 1024x768 32-bit display
-g 1024x768x32 - a USB keyboard
-device usb-kbd - a USB mouse
-device usb-mouse - SDL display buffer
-sdl
There are many other useful config switches available for the PowerPC emulation if you need to troubleshoot or tweak. The final item, SDL, is required because the default GTK emulation, while faster, has major problems on Windows trying to keep the mouse captured.
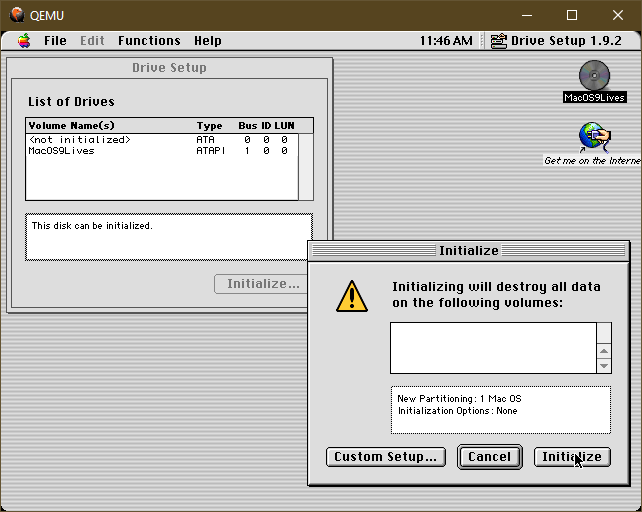
You should now be presented after a few seconds with a ReadMe. Just close that with the top-left window control then click into the Drive Setup window, select <not initialized>, press the Initialize button then confirm it with the default on the subsequent Initialize window.
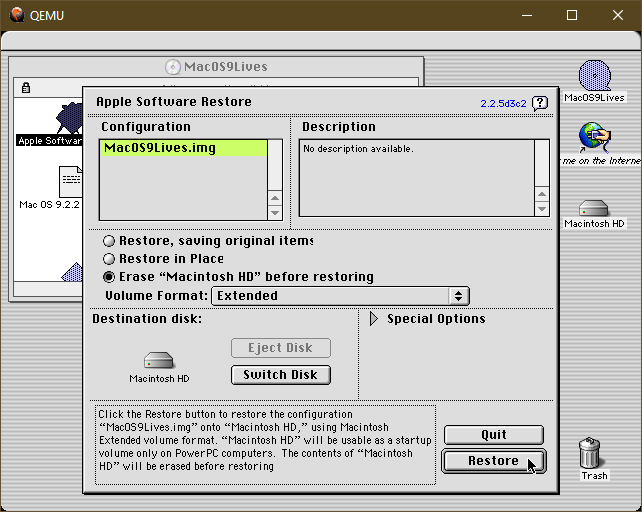
You might now want to click the "untitled" hard drive icon that's appeared on the desktop, wait a few seconds and you should be able to rename it. Typically Macintosh HD is a popular choice.
Head up to the MacOS9Live CD icon, double click it then double-click on Apple Software Restore. The following Window will appear. You can accept all the defaults or just change Volume Format to Extended - I did this just in case I want to try and mount the image on my MacBook at a later date.
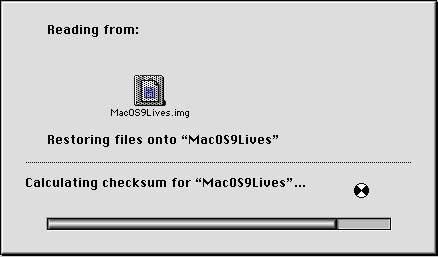
Clicking Restore, then confirming the dialog will give you a progress bar that is comically fast for installing an operating system (via software emulation no less).
Now you'll need to head to the Special menu and choose Shut Down.
Using our virtual Mac OS 9
Finally, we want to start our freshly created machine without booting from the ISO. The command line is mostly the same just omitting the ISO and boot-from-CD options:
qemu-system-ppc -cpu g4 -M mac99,via=pmu -m 512 -hda c:/retro/Mac/MacOS9HD.img -device usb-kbd -device usb-mouse -sdl
You'll probably want to put that in a shortcut icon.
Here's a
PowerMac G4 "Quicksilver" Icon (128 KB) I put together.
When it boots for the first time you'll get a Register With Apple "wizard". Just press WindowsQ to quit this and get to that Platinum desktop!
Head to the Control Panel's Monitors applet to set the screen size/resolution you want. You might also want to head into Appearance applet's Fonts tab to turn off anti-aliasing so you can enjoy the fonts in their pixel-glory. (You can also switch from the revised Charcoal front back to the classic Chicago font here). You may also have to switch screen-resolution again if you see some odd artifacts/missing/doubled pixels when turning it off. (There's a quick resolution changer on the control-strip in the lower left, it's the one with the checkerboard effect)
Remember to always shut-down correctly! Use the switcher at the top-right to "switch" to Finder then go through that Special, Shutdown process each time. QEMU will close several seconds after it's complete.
On your hard-drive you'll find an Applications folder, dig into Internet Utilities, Classilla folder and you can launch Classilla which is a port of the Netscape browser made in 2014 (based on Netscape Navigator 1.3.1 Nokia N90 port). It was a valiant effort given how diferent Mac OS development was prior to Mac OS X - there were no Unix libraries/support so ports were difficult and most applications were written in MetroWerks CodeWarrior - the "classic" Mac OS version was discontinued in 2002.
Still Classilla is much better than IE 5.5 which fails to do anything at all. Google works, for example, but many sites don't render at all because of the push to later versions of SSL the browser does not support.

You can find a ton of old Mac software at The Macintosh Repository but there are no more capable browsers.
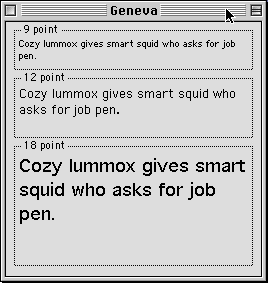
Still, it's a fun environment to play with and it's nice to have 100% accurate references to Geneva, Chicago, Monaco, Espy Sans etc. as most "conversions" tend to be hand-converted and mistakes are a-plenty. I've done a few conversions myself this way on FontStruct and know how easy it is to make mistakes when working from screenshots especially when it comes to spacing between letters.
It's also nice to see an old friend again. Despite regularly finding myself on retro machines and emulators spanning 8 and 16 bit machines I don't have (or have the space for) a classic Mac and emulation has been difficult. I think I last used Mac OS 9 in 2000 on an iMac at work before we put the Mac OS X Public Beta on it since I was a NeXT/OpenStep fan and wanted to see what they had done to it!
My thanks to James Badger for his general article on Mac OS 9 on QEMU.
[)amien
1 response
When copying into cmd: qemu-system-ppc -cpu "g4" -M mac99,via=pmu -m 512 -hda c:/retro/Mac/MacOS9HD.img -cdrom "c:/retro/Mac/Mac OS 9.2.2 Universal Install.iso" -boot d -g 1024x768x32 -device usb-kbd -device usb-mouse -sdl
I get the following error : invalid option