
With Windows 8 right around the corner it’s time to build a new desktop PC that will scream for both development and gaming.
Having set a personal budget of around $1500 I started the arduous process that every DIY PC builder has gone through… researching parts and playing with specifications until it feels just right.
These are the parts I finally landed on and a second choice if my budget was lower that would deliver almost as much for a lot less.
Please note that Amazon prices go up and down all the time so keep an eye on your basket! :)
Prices last updated 13 June 2013
My list doesn’t include a keyboard, mouse or monitor as I already have ones I love. You probably do too.
Processor
I went with Intel’s fastest i7 non-Extreme desktop chip that allows over-clocking in case I felt like going that way, though I haven’t yet.
If running virtual machines are an important part of your life (and for many developers that’s true) then check out the Intel Core i7-3770S which has Intel Virtualization for Directed IO (vt-D) but gives up the over-clocking and runs at a more modest 3.1GHz.
Cheaper: Intel Core i5-3570K Quad Core comes in at $110 less and provides very similar performance for games as the main difference is the reduced cache and lack of hyper-threading. If you’re not running heavily-multi-threaded applications you’re unlikely to notice much difference in performance.
Mainboard
MSI Z77A-GD65 $176
This “military-grade” Intel Z77 chipset based motherboard from MSI works great with the 3770K chip and provides 4 USB 3.0 sockets and 4 SATA 6Gbps ports instead of the usual 2 giving up PCI slots entirely for 3 PCIe instead. It can support three graphics cards in either SLI or CrossFire in x8/x4/x4 configurations and has Intel networking.
Cooling has been carefully thought out and includes head-pipes and a low-profile heat-sink. With a two-digit debug display, dual BIOS, UEFI support and one-button over-clocking it’s hard to mess this up.
BIOS flash update was painless.I didn’t have much luck with MSI’s Live Update as it doesn’t actually install things so just head to the driver download page and pick the drivers you’ll be using. In my case I skipped a number of the Intel ones such as the graphics, etc. You might be tempted to head to Intel’s site instead but I found newer versions were actually available from MSI instead.
Cheaper: Gigabyte GA-Z77-DS3H $110 has good reviews and includes the dual UEFI BIOS too but looses the x8/x4/x4 mode for 3 graphics cards, Atheros networking and is not as over-clocking friendly.
RAM
Corsair are a well known brand with a solid reputation. This RAM is fast at 10-10-10-27 timings, low-profile (don’t get in the way of large CPU coolers) and is provided as two 8GB modules not four 4GB which leaves you room to upgrade nicely in the future.
That is the RAM I meant to buy, but I picked up the older XMS3 which is slower (11-11-11-30 at 1600MHz) and not recommended.
Cheaper: Corsair 8GB for $70 offering the same performance at half the capacity should be good enough for most games and development projects.
Storage
I’ve been maintaining my MacBook SSD article over the last few years and originally picked the Crucial C300 series that was superseded by the M4 and now I think the sweet spot in price, performance and reliability was the Samsung 830. That has since been replaced by the 840 Pro. Link & price updated!
Cheaper: At $98 the 120GB model of the Samsung 840 (non-pro) is hard to pass up.
If you need a lot more storage pair it with a 2.5TB Western Digital Caviar Green for $129 more to hold files that aren’t performance critical like video, music, photos etc.
Video card
Nvidia and ATI still battle it our going back and forth as leaders in a market that seems stale. I couldn’t resist aiming high-end card (the GTX 690 is just insane in both perf and price) and so settled on the GTX 680.
With most manufacturers basing their cards on the reference designs the only real choice is the bundle and RAM and clock speed tweaks. The EVGA comes in at a good price and the over-clocked version nudges up the perf for no extra cost.
Cheaper: The cheapest option would be to use the Intel HD 4000 graphics built into the CPU but gaming performance will suffer. I’d go for the EVGA GTX 660Ti 2GB at $295 instead.
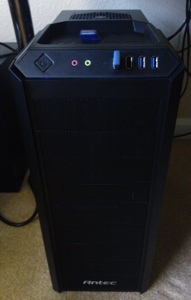
Case
I had a hard time choosing a case. My last PC was in the deliciously simple black Lian-Li PC60 all-aluminum and today’s market felt limited once you discount the spiky, alien or nightclub themed offerings.
The Antec One Hundred has a lot of positive reviews and has a nice black mesh look and painted interior for a very low price. The power supply lives in the bottom to provide better cooling and a lower center of balance. Cooling is via two two-speed fans at the rear either side of the CPU, a 120mm on the back and a 140mm at the top with air coming through the front of the case which appears as 9 mesh sections although only the top 3 are actually removable 5.25″ bays and the fourth segment holding a removable 3.5″ one.
Cheaper: For $35 you can grab the NZXT Technologies Source 210 which still has a nice interior and look. Or you could all the pieces in a pile separated with pieces of cardboard.
Power supply
I’ve had a fair amount of bad experience with poor power supplies. Some have blown out, rattled, tripped or turned out to be responsible for instabilities.
This time I decided to pay off the power gremlins with a very high quality, quiet, efficient and powerful-but-not-crazy power supply and I also wanted modular.
The cables came in a smart little sturdy bag and so assembly was a case of finding the right cable then routing it down to the power supply and finding the right offset in one of the two long banks of almost identical looking connectors. This was a little tricky but the connectors won’t let you put them in the wrong place.
Cheaper: Corsair’s CX600W $67 is half the price but gives up the modularity, some power and efficiency and likely produces more noise.
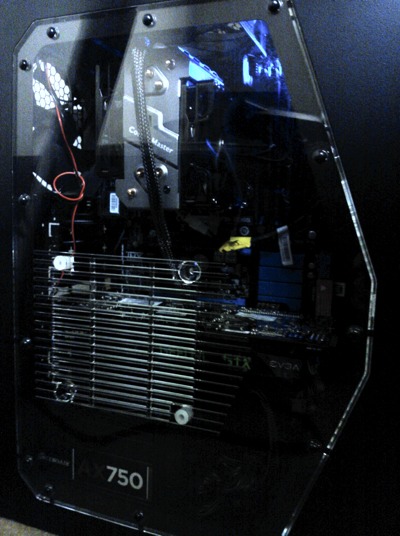
Build notes & noise
 My machine is now fully assembled and running Windows 8 RTM and Visual Studio 2012 and Steam connected to my existing favorite Dell 2408WFP display, IBM Model M Keyboard and Logitech G500 mouse.
Self builds are never completely smooth and I was under the impression the 3770K did not come with a fan. It does but at that point I already purchased and unwrapped a CoolerMaster HyperN 520 seduced by the promise of a quiet 19dBA.
Noise is an important issue for me and running six fans (120mm back case, 140mm top case, 2x80mm CPU, power supply, graphics) was never going to be an acceptable option. At least the power-supply fan is rarely even on and the 680 fan is very quiet.
The first step was to remove the CPU fans as they were the loudest and surprisingly the CPU did not get too hot, likely due to the sheer size of the heat-sink of the 520. Experimenting with the case fans revealed that the just the 120mm fan on low provided the least noise and still kept things reasonably quiet and plenty cool enough.
I wasn’t done yet while I could still hear it so tried a couple of replacement fans before settling on a Cooler Master Excalibur 120mm. This fan can be speed-controlled by the motherboard as it supports the 4-pin PWM system and given it’s close proximity to the CPU head-sink I plugged it into the CPU fan socket and configured the BIOS to control it to keep the CPU under 70 degrees C.
It runs whisper-quiet at 800 RPM when under normal workloads.
I couldn’t help but try the magic one-press over-clock button on the motherboard and watch the machine hit 4.2GHz which ran just fine for hours. If anything is holding that back it’s the fact I ordered slower Corsair memory by mistake :(
Still to come
Now that cooling is done (see above) my main areas of focus are:
- Try getting Intel 4000HD graphics switching via Virtu working on Windows 8 so that power usage drops under light loads
- Keeping an eye on disk space to see whether I should get a large mechanical drive or a second 256GB SSD… or perhaps a third in RAID-5.
In case you want to see the whole thing on Amazon I created a Listmania list Great Windows 8 gaming & developer PC self-build.
Performance
As promised here are some performance figures for my machine (with slower Corsair than above but 32GB of it) using Nvidia’s 306.23 WHQL drivers on Windows 8 64-bit RTM.
| Component | Details | Subscore | Base score |
|---|---|---|---|
| Processor | Intel(R) Core(TM) i7-3770K CPU @ 3.50GHz | 8.2 |
8.1
Determined by lowest subscore
|
| Memory (RAM) | 32.0 GB | 8.2 | |
| Graphics | Nvidia GeForce GTX 680 | 8.1 | |
| Gaming graphics | 4095 MB Total available graphics memory | 8.1 | |
| Primary hard disk | 72GB Free (238GB Total) | 8.1 |
[)amien
PS I can’t believe it’s been 7 years since I last built a PC!
6 responses
Interesting that you picked almost the exact same part as I did about 2 months back for my new rig. Only I went with an Ati HD 7850, which has had some driver trouble, but is more stable now.
Really like this motherboard and cpu combo, hardly had to tweak anything, it just works !
thanks for sharing your build, very timely for me since I'm wanting to do an i7-3770 desktop as well. I'm not sure I want to overclock but think it would be an option worth keeping open. I've never build one and the Fry's option for assembly sound interesting
If you've ever assembled Ikea furniture it's not that much harder. There are books but it's so easy it's not really worth it. It basically comes down to dropping the CPU and pushing the memory into the mainboard, then securing that with six screws into the case. Then plugging the wires from the case into the mainboard, fitting the PSU and doing the same and then running power and a data cable from the mainboard to your hard drive. If you purchased a graphics card that's just a case of pushing it into the slot and running a cable from that to your power supply too.
If you want step by step instructions the motherboard manual itself is a good place to start. One important tip I will give you is to not use any of the installation CDs that come with anything. Head to the manufacturer web sites and get the latest drivers instead.
If you want to choose your own spec but not actually assemble it yourself one option is to buy the parts from Fry's and have them assemble it for you - I think they charge about $75 for that and their prices for these parts are actually pretty close. Another option is to try AVADirect at https://www.avadirect.com/gaming-pc-configurator.asp?PRID=24249 which will build you the same thing for $1875 with a three year warranty.
Good stuff mate, looks like a decent build that.
Just waiting for those Steam game invites now for us to play some games again :)
Damien, Looks great! I would like try to build my own, but never having done it before, am worried I'd screw it up. Any idea of where I could find step by step instructions, or a book on build your own pc for dummies?
Great post! I too have not built a PC since around 2007. Appreciate the research you put into your build and I may just copy it.