I've been using Nuxt quite extensively on the static sites I work on and host and use Cloudflare Pages to host them. It's a great combination of power, flexibility, performance and cost (free).
While one of the sites I manage uses ActiveCampaign successfully for both their newsletters and contact forms, this latest customer just wanted plain emails ideally with no subscription involved.
Thus started my journey to find a simple, free, email service that I could use to send emails from a Nuxt3 site hosted on Cloudflare Pages.
Brevo email sender
What I needed was an email service that I could POST to that would then send the email on to the customers email address with the message from the contact form as well as a reply-to address corresponding to the contact information from the form.
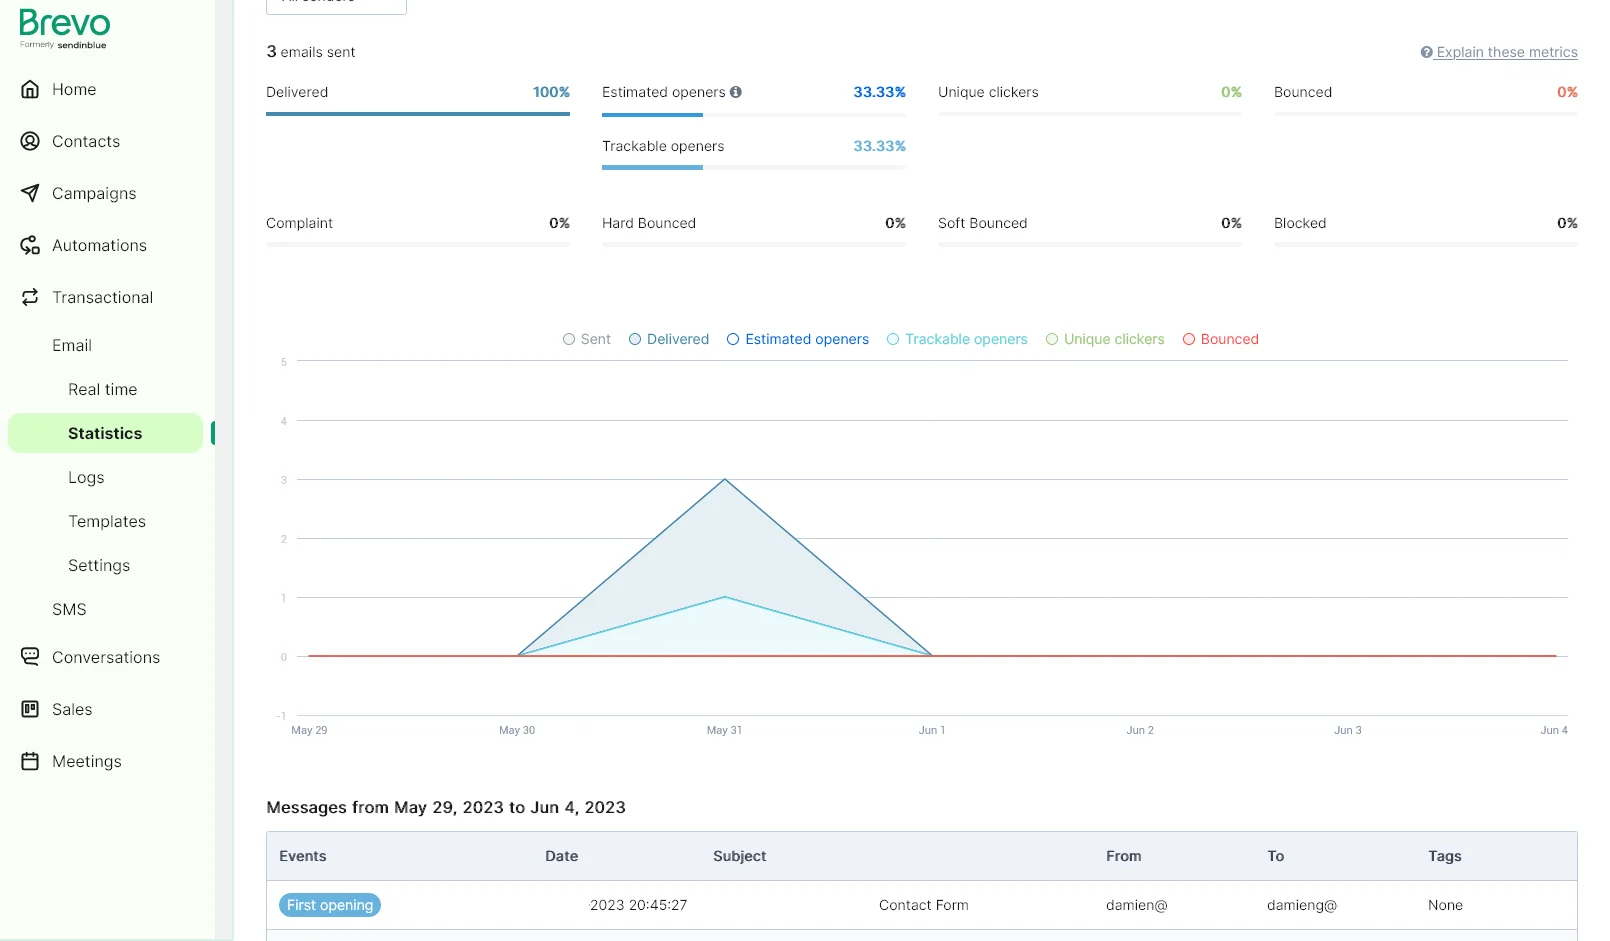
I found Brevo (referral link) which provides a Transactional Email feature that did exactly what I wanted and their free tier has 300 emails/day which is more than enough for their contact form. As a bonus it includes some really great logging and statistics to keep an eye on things and make development and testing a little easier.
The developer docs guide you through using their SDK and while I normally go that route this was such a simple use case that I decided to just use their HTTP API directly and avoid bringing in dependencies especially given this is going to be called from a serverless function (more on that in a moment).
Once you've signed up you need to head over to get a v3 API key which you will need to send in the headers when making the API request.
function sendEmail(
  fromEmail: string,
  firstName: string,
  lastName: string,
  message: string
): string {
  const response = await fetch("https://api.brevo.com/v3/smtp/email", {
    method: "POST",
    headers: {
      accept: "application/json",
      "api-key": "[your brevo api key here]",
      "content-type": "application/json",
    },
    body: JSON.stringify({
      sender: {
        name: `[from name]`,
        email: "[from email address]",
      },
      to: [{ email: "[to name]", name: "[to email address]" }],
      replyTo: {
        email: fromEmail,
        name: `${firstName} ${lastName}`,
      },
      subject: "Web Contact Form",
      textContent: message,
    }),
  })

  if (!response.ok) {
    return "Message could not be sent at this time."
  }
}
Okay, so that part is done but we need to call this from somewhere...
Creating a Nuxt3 server API
I thought about putting a serverless function up on my usual spots - Azure Functions or AWS Lambda - but given the site is already on Cloudflare Pages and they now support Workers it would be nice to keep it together.
Given that the rest of the site is already a static site on Nuxt3 and this infrastructure should include server-side support let's see what we can do.
First off we create a new file called sendContactForm.post.ts and put it into the server/api folder in the Nuxt3 project. This tells Nuxt3 we want a function and that it should be on the server and that it is post only.
A simple API to call our new function would look something like...
export default defineEventHandler(async (event) => {
  // Validate parameters
  const { name, email, message } = await readBody(event)
  if (!name || !email || !message) {
    throw createError({
      statusCode: 400,
      statusMessage: "Missing required fields",
    })
  }

  return sendEmail(email, name, message)
})
This is a simple function that validates the parameters and then calls our sendEmail function from earlier. To call it from our contact form we'd do something like this:
// Add this to the <script setup lang="ts"> section of your form and wire up fields and button and add client validation.

const email = ref("")
const name = ref("")
const message = ref("")

const result = await fetch("/api/sendContactForm", {
  method: "POST",
  headers: {
    "Content-Type": "application/json",
  },
  body: JSON.stringify({
    email: email.value,
    name: name.value,
    message: message.value,
  }),
})

const status = await result.text()
//...
You can bind the text boxes using v-model and add some validation to make sure they are filled in correctly before submitting the form.
Now starting local development with yarn dev we can submit the form and see the email come through. (If it doesn't then check the console log for errors or Brevo's great logs page to see what happened).
reCAPTCHA to prevent spam
Now that we have a working contact form we need to prevent spam. I've used reCAPTCHA before and it works great. There are two basic parts - the page executes some JS from Google that generates a token that is tied to what they think about the users behavior and likely spammyness.
We then take that token and sent it to our API which calls Google with the token and our secret key and Google tells us the score. Literally with v3 we get a score between 0 and 1. If it's less than 0.5 then it's probably spam and we can reject it.
To get going you first sign up with Google reCAPTCHA and create a new "site". You'll need the site key and secret key for the next steps. You can add "localhost" to the domains for local testing.
Client-side detection
Now we need to add the reCAPTCHA script to our site. The easiest way is to add the vue-recaptcha-v3 package to our project.
yarn add vue-recaptcha-v3
Then we need create a new plugin in plugins/google-recaptcha.ts:
import { VueReCaptcha } from "vue-recaptcha-v3"

export default defineNuxtPlugin((nuxtApp) => {
  nuxtApp.vueApp.use(VueReCaptcha, {
    siteKey: "[your site key here]",
    loaderOptions: {
      autoHideBadge: true,
      explicitRenderParameters: {
        badge: "bottomright",
      },
    },
  })
})
Next we'll need to call it from our contact form to get a token we can send to the server when the form is submitted.
<script setup lang="ts">
  import { useReCaptcha } from "vue-recaptcha-v3"

  const recaptchaInstance = useReCaptcha()
  const recaptcha = async () => {
    await recaptchaInstance?.recaptchaLoaded()
    return await recaptchaInstance?.executeRecaptcha("emailSender")
  }

  const sendMessage = async (e: Event) => {
      const token = await recaptcha()
      const result = await fetch("/api/sendContactForm", {
        method: "POST",
        headers: {
          "Content-Type": "application/json",
        },
        body: JSON.stringify({
          token: token,
          email: email.value,
          firstName: firstName.value,
          lastName: lastName.value,
          message: message.value,
        }),
      })
  })
  //...
</script>
Server-side validation
Now that we have the client-side taken care of we turn to the server-side which will send the token to Google and get the score. Here's a little function to do just that.
function validateCaptcha(token: string): string {
  const response = await fetch(
    "https://www.google.com/recaptcha/api/siteverify",
    {
      method: "POST",
      headers: {
        "content-type": "application/x-www-form-urlencoded",
      },
      body: `secret=${process.env.RECAPTCHA_SITE_KEY}&response=${token}`,
    }
  )

  const verifyBody = await response.json()
  if (!verifyBody.ok) return "Unable to validate captcha at this time."
  if (verifyBody.success !== true || verifyBody.score < 0.5)
    return "Invalid captcha response."

  return "ok"
}
And now we can revise our handler to call our new validation function and decide whether to send the email or return an error.
export default defineEventHandler(async (event) => {
  // Validate parameters
  const { firstName, lastName, email, message, token } = await readBody(event)
  if (!firstName || !lastName || !email || !message) {
    throw createError({
      statusCode: 400,
      statusMessage: "Missing required fields",
    })
  }

  const captchaResult = await validateCaptcha(token)
  if (captchaResult !== "ok") return captchaResult

  return sendEmail(email, firstName, lastName, message)
})
Deploying to Cloudflare Pages
Now I knew that Cloudflare Pages supported serverless functions and that Nuxt3 supported static site generation and serverless functions but it had its own syntax and I wasn't sure how it held together. The good news is it does, specifically:
- You have to use
buildand notgenerateor Nuxt will skip building the functions - Nuxt can convert the server/api folder into serverless functions
- It uses a server called Nitro to do this
- Nitro supports multiple modes including three for Cloudflare alone
cloudflarewhich uses the service-worker "Cloudflare Worker" syntaxcloudflare-pages(combining everything into a_worker.jsfile)cloudflare-module
The docs say it should detect the environment and do the right thing but you can always override it in your nuxt.config.ts file (you'll also need to do this if you're wanting to check what it generates locally):
// https://nuxt.com/docs/api/configuration/nuxt-config
import { defineNuxtConfig } from "nuxt/config"

export default defineNuxtConfig({
  // ...
  nitro: {
    preset: "cloudflare-pages",
  },
  // ...
})
If you are using the Cloudflare Wrangler tool or GitHub actions to deploy then you'll probably need to search around the web for more information. If you're using the Cloudflare Pages UI then just make sure the tech stack is set for Nuxt and that it's using yarn build (you'll also need to set your environment variable for RECAPTCHA_SITE_KEY).
Final testing
Once that's all in place you should be able to go into the Cloudflare Pages UI and see that it now has functions detected. Head over to your contact form, fill in the details and hit send!
If all goes well you should see the email come through and the result of the form submission should be "ok". If you get an error then check the console log for errors or the Brevo logs to see what happened.
Conclusion
This was a fun little project to put together and I'm really happy with the result. I'm sure there are other ways to do this but this is a nice combination of free services that work well together and are easy to set up and maintain.
I hope you found this useful!
Damien
Disclaimer
I am a Brevo partner eligible for commission on sales I make directly with them however I do not receive any compensation for this article or have link-based referrals for commission.
0 responses